ottoman etiketine sahip kayıtlar gösteriliyor. Tüm kayıtları göster

16 Temmuz 2009 Perşembe

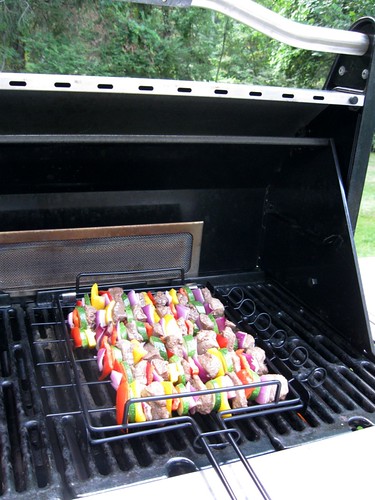
Tender Beef Kebabs


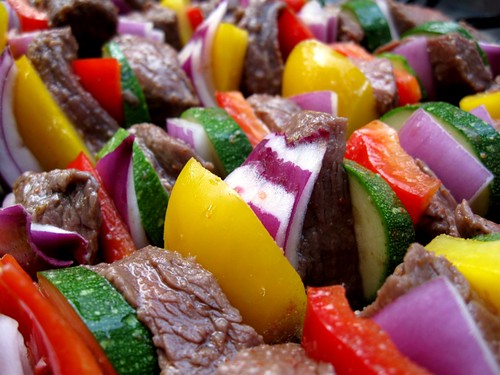
It's summer, so it must be time to use the grill! I wanted to make something healthy, but also tasty, so I decided kebabs might be a good option.

Beef kebabs might not be as healthy as, for example, chicken breast, but, beef has the advantage that it doesn't have to be cooked through. Just make sure to pick a decent piece of beef, I used sirloin for these, and cut off any excess fat that is visible.
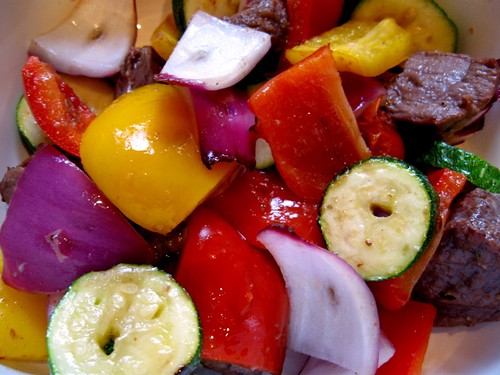


You can also pick a variety of veggies to use. My choices were yellow and red pepper, red onion, green squash (zucchini), and grape tomatoes. Any veggie that can hold itself together when cooked works for grilling on a skewer. Yellow squash, green pepper (any sweet peppers), jalepenos, pearl onions, mushrooms - these would all be great for grilling.


Beef Kebabs
Makes 4 servings

1.5 lbs beef, cut into 1 1/2 inch chunks
1 yellow pepper, cut into 1 inch square pieces
1 red pepper, cut into 1 inch square pieces
1 medium red onion, cut into 1 inch square pieces
1 green squash, cut into 1 inch square pieces
15 grape tomatoes
1/3 cup olive oil
1/4 cup red wine vinegar
1 1/2 tsp garlic powder
1 tsp cumin powder
1 tsp cayenne powder
1 tsp chili powder
1 tsp salt
1/2 tsp freshly ground pepper

Place olive oil, vinegar, garlic powder, cumin, cayenne, chili, salt, pepper and beef into a ziploc bag. Close bag tightly, squeezing out any excess air. Massage the mixture into the beef for one minute. Marinade in the fridge for three to six hours, turning over once halfway through.
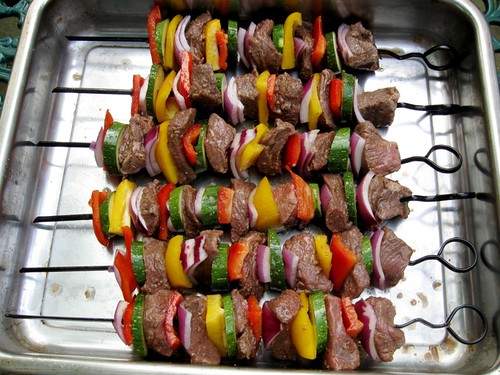


If you are using wooden skewers, you will need to soak them in water for a few hours. I used metal, non stick skewers. Making kebabs is fun. Put pieces of beef, alternating with different vegetables on to each skewer. Don't clean your hands between beef and vegetable additions; the marinade from the beef will coat the vegetables as you handle them.
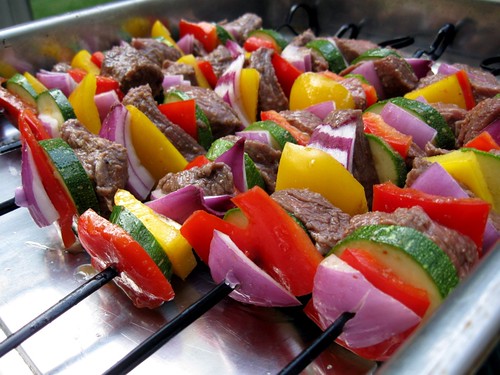


Place the skewers on a hot grill. I grilled the skewers for about 5 minutes per side, with the lid of the grill closed.


I served the kebabs over rice. They were tasty!

Hazelnut Cookies

Hazelnut Cookies
Ingredients: 150 grams flour, 75 grams sugar, 75 grams butter, 1 tablespoon ground hazelnuts, 1 tablespoon cinnamon, 1 egg yolk, 18 hazelnuts,

Number of cookies: 18

Knead 150 grams flour, 75 grams sugar, 75 grams butter, 1 tablespoon ground hazelnuts and 1 tablespoon cinnamon into a cohesive dough. Wrap the dough in cling film and leave it certainly an hour in the refrigerator. Preheat the oven to 180 degrees. Roll the dough into a thin piece and make cookies of it. Place the cookies on a plate lined with baking paper. Cover the cookies with a mixed yolk. Press gently in each cookie a hazelnut. Place the plate about 10 minutes in the preheated oven. Let the cookies cool. Enjoy!

14 Temmuz 2009 Salı

Balsamic Portobello Turkey Sliders

After eating these, you’ll be asking, “Where’s the Beef?” The Worcestershire sauce in the ground turkey meat really makes them taste like ground beef, but so much healthier. We love the concept of “sliders” or mini burgers, they’re just too cute! I’m sure you’ll be seeing different variations of these bite sized beauties… as they’re fun to make and even more fun to eat.

Balsamic Portobello Turkey Sliders

Balsamic Portobello Turkey Sliders

(Based on a recipe by Rachel Ray, with lots of modifications).

INGREDIENTS
1/2 onion, chopped
1 pounds ground turkey
1/4 cup Worcestershire sauce
salt and pepper to taste
1 teaspoon Emeril’s Essence (make your own here)
Extra-virgin olive oil
8 dinner rolls (we used Challah rolls from Trader Joe’s), split and toasted
2 portobello mushrooms, diced
More salt and pepper
about 1/2 cup Balsamic vinegar
1/2 cup mayonnaise
Coarse black pepper
4 slices Provolone or Swiss cheese (optional)
Baby greens
Tomato, sliced

DIRECTIONS
Saute onions in a small pan over moderate heat for 3 to 5 minutes until tender.

Brush a cookie sheet with olive oil. Combine meat with Worcestershire sauce, onion, salt, pepper, and essence and mix well. Form 8 small patties slightly larger than the size of your dinner rolls (they will shrink when cooked) and place on cookie sheet. Broil patties for 3 minutes, flip, and broil 3 minutes more.

Heat some olive oil in a medium nonstick skillet over medium high heat. Add mushrooms and 2-3 tablespoons Balsamic vinegar, season with salt and pepper, and saute until just tender, about 3 to 5 minutes. Remove from heat.

Combine mayonnaise, 2-3 additional tablespoons Balsamic vinegar, and more essence (optional). Spread onto both sides of toasted rolls. Add patty, cheese, mushrooms, tomato, and greens. Enjoy!

13 Temmuz 2009 Pazartesi

Turkey Meatballs with a Minted Yogurt Dipping Sauce ottoman turkish

We saw Emeril make these little bites and just had to try them. I’m a huge ground turkey fan, and this was a delicious recipe for it. We ate them as our entire meal along with some toasted bread, but they’d be great appetizers as well. Or, make yourself a meatball sandwich! The yogurt dipping sauce is a must, though… really adds something special to the meatballs.

We also substituted soy creamer for the heavy cream, and used regular plain yogurt instead of the whole milk/greek yogurt. No loss there. :)

Turkey Meatballs with a Minted Yogurt Dipping Sauce

Turkey Meatballs with a Minted Yogurt Dipping Sauce

Makes 3-4 dozen. Recipe from Emeril.

INGREDIENTS
1 1/2 pounds ground turkey
1/4 cup plus 2 tablespoons extra-virgin olive oil
1 small red onion, very finely chopped
1 scallion, finely chopped
1 1/2 teaspoons minced garlic
1 1/2 teaspoons ground cumin
1/2 cup dried bread crumbs
1/4 cup heavy cream
1 egg
1 egg yolk
4 tablespoons chopped fresh mint leaves
3 tablespoons chopped fresh parsley leaves
1 1/4 teaspoons salt, plus a pinch
1/4 teaspoon freshly ground black pepper, plus 1/8 teaspoon
1 1/4 cups plain whole milk yogurt, preferably Greek, drained overnight in a cheesecloth-lined fine mesh sieve
1 lemon, zest finely grated and juiced

DIRECTIONS
Place the turkey in a medium mixing bowl and set aside. Heat 2 tablespoons of the oil in a small skillet and, when hot, saute the red onion and scallions until softened, 3 to 4 minutes. Let cool slightly, then add to the turkey, along with the garlic, cumin, bread crumbs, heavy cream, egg and egg yolk, 3 tablespoons of the mint, the parsley, 1 teaspoon of the salt and 1/4 teaspoon of the pepper. Mix gently but thoroughly. Using a small scoop or spoon, divide the mixture into 1 tablespoon portions and roll into smooth round balls. Place on a parchment paper-lined baking sheet and cover with plastic wrap. Refrigerate until thoroughly chilled, about 1 hour.

While the meatballs are chilling, make the dipping sauce. Combine the yogurt, remaining 1 tablespoon of mint, remaining 1/4 teaspoon plus a pinch of salt, remaining1/8 teaspoon of pepper, and lemon zest, 2 tablespoons olive oil, and lemon juice and whisk to combine. Refrigerate until ready to serve the meatballs.

Preheat the oven to 400 degrees F. Brush the meatballs with the remaining 2 tablespoons of olive oil and bake until browned and cooked through, about 10 minutes.

Let the meatballs cool slightly, then serve warm, with the yogurt dipping sauce.

Yield: About 5 1/2 dozen bite-size meatballs, generous 1 cup sauce, serving 6 to 8

Lentil Walnut Burgers with Yogurt Sauce

Obviously we are intrigued by lentils. They require some effort, but have so much potential we just can’t ignore them.

Side note, lentils also make a great filling for handmade computer wrist rests. Just sew a tube of fabric, fill it with uncooked lentils, sew shut, and save yourself $15 by not having to buy a fancy schmancy gel one.

Back to food…
These were quite good. The yogurt sauce is a MUST. So is the egg, apparently… I had made cookies earlier in the day, and failed to realize that we needed the last egg for these burgers. Ooops. So we made the recipe without the egg. Tasted great, still, but they were very volatile and a bit dry, crumbling all over the place. We ended up cooking them in the oven for 8-10 minutes per side instead of pan frying them, which is probably healthier anyway! Didn’t want to take a chance that the patties wouldn’t flip. :)

Lentil Walnut Burgers with Yogurt Sauce

Lentil Walnut Burgers with Yogurt Sauce

Makes 4 servings. Recipe from Everyday Food.

INGREDIENTS
3/4 cup toasted walnuts, cooled
1/3 cup plain dried breadcrumbs
3 garlic cloves, coarsely chopped
2 teaspoons ground cumin
2 teaspoons ground coriander
1/4 to 1/2 teaspoon red-pepper flakes
Coarse salt and ground pepper
3/4 cup lentils, cooked, drained, and cooled
4 tablespoons olive oil
1 large egg

Yogurt-Cilantro Sauce:
3/4 cup plain low-fat yogurt
Coarse salt and ground pepper
2 tablespoons chopped fresh cilantro leaves
1 tablespoon fresh lemon juice

DIRECTIONS
In a food processor, combine walnuts, breadcrumbs, garlic, cumin, coriander, pepper flakes, 1 1/2 teaspoons salt, and 1/4 teaspoon pepper; process until finely ground. Add lentils and 1 tablespoon oil; pulse until coarsely chopped (some lentils should remain whole).

In a large bowl, whisk egg. Add lentil mixture; mix well. Divide into 4 equal-size parts; roll into balls, and flatten with the palm of your hand into 3/4-inch-thick patties.

Heat remaining 3 tablespoons oil in a large nonstick skillet. Add burgers; cook over medium-low heat until crisp and browned, turning gently with a thin-edged spatula, 8 to 10 minutes per side. Transfer to a paper-towel-lined plate to drain.

In a small bowl, whisk together yogurt, cilantro, and lemon; season with salt and pepper.

Assemble burgers and top with yogurt sauce, sliced red onion, tomato, and lettuce.

Asian Lettuce Cups with Ground Turkey and Apple

I have a new favorite food blog, Jaden’s Steamy Kitchen. Discovered when Jaden kindly commented on my Sushi photo from a few weeks back. Her posts are eye-candy and mouthwatering and informative to boot. I don’t dare compare my photos to hers (there is no comparison), but I would like to share the first of many (I’m sure) delicious recipes we’ve tried from her blog.

Asian Lettuce Cups with Ground Turkey and Apple

Asian Lettuce Cups with Ground Turkey and Apple

See the original recipe here.

What a delicious and refreshing take on lettuce wraps. You might think that apple is a strange addition, but it’s beyond perfect. And as you might know, I’m a huge fan of ground turkey.

And if you’ve never fried mung bean noodles, go out and buy some and fry them NOW. it is a life changing experience. Seriously. Just make way less than you think you’ll need, as you can see from the photo below, a little noodle becomes a lot of noodle after it’s been fried.

Fried Mung Bean Noodles

Seriously the most fun we’ve had in the kitchen for a long time (and believe me, we have fun).

Turkey Meatball Sliders and Red Sauce

Taylor was in heaven when we made these little puppies. I managed to convince him to use ground turkey meat instead of the three-meat combo, but being that I’m not a big tomato fan, he doesn’t get robust red sauces too often. And for a ball of meat covered in red sauce, they weren’t bad. :)

Turkey Meatball Sliders and Red Sauce

Turkey Meatball Sliders and Red Sauce

Makes 6 servings. Recipe from Bon Appetit.

INGREDIENTS
1/2 pound ground beef
1/2 pound ground pork
1/2 pound ground veal
1/2 cup panko (Japanese breadcrumbs)*
1/2 cup water
8 tablespoons freshly grated Pecorino Romano cheese, divided
1 large egg
1 large egg yolk
1/4 cup plus 2 tablespoons chopped fresh parsley
1 teaspoon salt
1/2 teaspoon ground black pepper

1/4 cup vegetable oil
2 tablespoons olive oil
1 cup chopped onion
6 garlic cloves, chopped
1/4 cup (packed) fresh basil leaves
1 1/2 teaspoons fennel seeds
1 28-ounce can whole peeled tomatoes
1 14.5-ounce can whole peeled tomatoes

DIRECTIONS
Mix all meats, panko, 1/2 cup water, 6 tablespoons cheese, egg, egg yolk, 1/4 cup parsley, 1 teaspoon salt, and 1/2 teaspoon black pepper in large bowl. Form into eighteen 2-inch-meatballs.

Heat vegetable oil in large skillet over medium-high heat. Working in batches, fry meatballs until brown all over. Transfer to plate. Pour off drippings from skillet. Reduce heat to medium. Add olive oil to skillet. Add onion, garlic, basil, and fennel seeds. Sauté until onion begins to brown, about 5 minutes. Add all tomatoes with juices. Bring to boil, scraping up browned bits. Reduce heat to low, cover with lid slightly ajar, and simmer, stirring occasionally, about 30 minutes.

Puree sauce in processor until almost smooth. Return to same skillet. Add meatballs. Cover with lid slightly ajar and simmer until meatballs are cooked through, stirring occasionally, about 30 minutes longer. DO AHEAD: Can be made 1 day ahead. Cover; chill.

Place arugula leaves on bottom of each roll, if desired. Top each with 1 meatball. Drizzle meatballs with some of sauce and sprinkle with remaining 2 tablespoons parsley and 2 tablespoons. cheese. Cover with tops of rolls.

Quinoa with Mango and Curried Yogurt Turkey Turkish Ottoman

We’ve been wanting to try quinoa (pronounced Keen-Wa) for sometime now, but it took a trip down to Wild Oats all the way across town to actually find it. But for this flavorful recipe, the trip was well worth it. The curry and peppers are deliciously spicy, but the cooling textures and flavors of the mango and mint perfectly compliment the heat. Plus, quinoa is really good for you (which makes you wonder why it isn’t more readily available). Anyways, if you can find it, I definitely recommend giving this one a try!

Quinoa with Mango and Curried Yogurt

Quinoa with Mango and Curried Yogurt

Makes 6 side dish or 4 main dish servings. Recipe from Epicurious.

INGREDIENTS
1/3 cup plain yogurt
1 tablespoon fresh lime juice
2 teaspoons curry powder
1 teaspoon finely grated peeled fresh ginger
3/4 teaspoon salt
1/4 teaspoon black pepper
2 tablespoons vegetable or peanut oil
1 1/3 cups quinoa (7 1/2 oz)*
1 lb firm-ripe mango, peeled, pitted, and cut into 1/2-inch chunks (2 cups)
1 red bell pepper, cut into 1/4-inch dice
1 fresh jalapeño chile, seeded (if desired for less heat) and minced
1/3 cup chopped fresh mint
1/2 cup salted roasted peanuts (2 1/2 oz), chopped

DIRECTIONS
Whisk together yogurt, lime juice, curry powder, ginger, salt, and pepper in a large bowl. Add oil in a slow stream, whisking until combined.

Rinse quinoa in a bowl using 5 changes of water, rubbing grains and letting them settle before pouring off water (if quinoa does not settle, drain in a large sieve after each rinsing).

Cook quinoa in a 4- to 5-quart pot of boiling salted water 10 minutes. Drain in a large sieve and rinse under cold running water.

Set sieve with quinoa over a saucepan containing 1 1/2 inches boiling water (sieve should not touch water) and steam quinoa, covered with a kitchen towel and lid, until fluffy and dry, 10 to 12 minutes. Toss quinoa with curried yogurt and remaining ingredients in a large bowl. Serve warm or at room temperature.

Leftover Turkey Tacos with Cranberry Salsa Ottoman Turkish

You know you found a good use for your turkey leftovers when the meal is good enough that you’d make it again some other time of year. Who knew turkey leftovers could be so good?

For the cranberry sauce, I used a few spoonfulls of our Vanilla Cardamom cranberry sauce, and then maybe 1/4 cup of our Grand Marnier Cranberry glaze. I also added a kiwi, just because I had one and it seemed like it would be a good fit. And it was! With this one, or anytime, be sure to wear gloves when cutting the jalepeño… it’s two days later and my fingers are still burning!

Leftover Turkey Tacos with Cranberry Salsa

Leftover Turkey Tacos with Cranberry Salsa

Recipe from Simply Recipes, with adjustments.

INGREDIENTS
Small flour tortillas
Cooked turkey meat, cut into bite-sized pieces
Mixed greens
Avocados, diced

Cranberry Salsa
1 1/2 cups of fresh or frozen cranberries, or premade cranberry sauce/glaze.
1 apple, peeled, cored, and diced
1 kiwi, peeled and diced
Zest of one orange (or, 1 tablspoon orange juice)
Chopped serrano or jalapeno chili to taste (about a half a chili, but taste for desired heat)
2 Tbsp sugar
1/4 cup chopped fresh cilantro
1/2 lime, juiced
Dash of salt

DIRECTIONS
Prepare cranberry salsa. Combine cranberries and apple in a food processor and pulse until coarsely shredded, about 10 short pulses. Combine shredded cranberries, orange zest, chile, and sugar in a medium bowl. Let sit 15 minutes for the cranberries to macerate. Add cilantro, lime juice, and salt to taste. You can also use cranberry relish, just add chopped chiles and cilantro.

Heat a large frying pan (preferably cast iron) on medium high heat. Unless you are using freshly made homemade tortillas, you will need to soften them first. Working one or two at a time, spread a little butter on one side of the tortilla and fry it in the hot pan for a few seconds on both sides. Most commercially made tortillas will bubble up a little when cooked like this.

Sprinkle one side of the tortilla with grated cheese, and cover one half of the tortilla with turkey meat. Fold over one side of the tortilla onto the other (like an omelette. Cook until the cheese is melted. You may need to flip the tacos over to cook the other side, but if the cheese is completely melted this is unnecessary.

Serve with cranberry salsa, fresh shredded lettuce (sprinkled first with a little vinegar and salt), and avocados.

Ramekin Turkey Pot Pies

Yes, it is a week after Thanksgiving and we are STILL eating leftovers. We only have one more bag of turkey in the freezer and half a bowl of mashed potatoes, and that will be gone after tonight.

These were another tasty treat. You will never look at a frozen pot pie the same again after eating a freshly made one! I only had one pre-made pie crust leftover (in my attempt to circumvent my pie crust ineptitude I used one, and it shrunk so much while blind baking it that I had to throw it away and make my own. So much for pre-made being easier!). Anyways, I only had one, and we didn’t want to have to deal with leftovers of leftovers. So we dug out our little ramekins (only 3… the 4th one broke), and used those. It couldn’t have been more perfect. We decided that crust on the bottom was unnecessary, and just put a round of pie crust on top of the filling. Even Taylor, who admitted he would have vetoed this recipe had I told him about it before hand, liked them, and even said they topped last night’s Turkey Cranberry Tacos. This might be another one we’ll have to make again!

Of course, we forgot to buy peas at the store. And our sweet potatoes weren’t in any position to be eaten again. The beauty of this recipe is that if you’ve got it, throw it in. A great leftovers recipe for any time of year.

Ramekin Turkey Pot Pies

Ramekin Turkey Pot Pies

Makes 4 servings (about 6 ramekins… halve for two people). Recipe based on this one by Emeril.

INGREDIENTS
6 tablespoons (3/4 stick) unsalted butter
1 cup chopped yellow onions
1/2 cup chopped celery
Salt and freshly ground black pepper to taste
6 tablespoons bleached all-purpose flour
2 cups Chicken Stock or canned chicken broth
1 cup half-and-half (or soy creamer)
1 cup peeled and diced red potatoes, cooked in boiling salted water until tender, 4 to 5 minutes
1 cup leftover sweet potatoes (if you have them)
1 cup diced carrots, cooked in boiling salted water until tender, 4 to 5 minutes (OR any leftover vegetables from Thanksgiving)
1 cup sweet young peas, fresh or frozen (defrost if frozen)
2 cups shredded cooked turkey, white and dark meat
2 tablespoons finely chopped fresh parsley leaves
2 pre-made pie crusts, room temperature

DIRECTIONS
Preheat the oven to 400 degrees. Grease a 9×9x2-inch baking pan or prepare 6 ramekins (no need to grease these).

Heat the butter in a large saute pan over medium-high heat. Add the onions and celery, season with salt and pepper, and cook, stirring, for 2 minutes. Stir in the flour and cook, stirring, for 3 to 4 minutes to make a blond roux. Stir in the chicken stock and bring the liquid to a boil. Reduce the heat to medium-low and simmer until the sauce begins to thicken, 4 to 6 minutes. Stir in the half-and-half and continue to cook for another 4 minutes. Season with salt and pepper. Stir in the potatoes, carrots, peas (or any other leftover Thanksgiving vegetables), turkey, and parsley, season with salt and pepper, and mix well.

Line the baking pan with one of the rolled-out pie crusts (if using). Pour the filling into the prepared pan or divide equally into ramekins. Place the second crust or a precut circle of dough on top of the filling. Carefully tuck the overlapping crusts into the pan, forming a thick edge. Crimp the edges, cut vents in the top crust, and place on a baking sheet. Bake until the crust is golden brown and crusty, 25 to 30 minutes (15-20 minutes if using ramekins). Let cool for 5 minutes before slicing to serve.

Turkey Cutlets in Anchovy Butter Sauce

Turkey Cutlets in Anchovy Butter Sauce

No! Wait! Don’t close it! Just because I said Anchovy doesn’t mean you have to duck and run for cover.

Seriously.

Not joking here.

No, really.

Believe me, I am NOT the type to go for the anchovy pizza. EVER. I grimace when Taylor adds the fish sauce to anything – let alone anchovies. But there is nothing anchovy-tasting about this dish. Why use it then? One word: depth. Otherwise this sauce would just be, well, melted butter. With the anchovy paste, it has a depth of flavor only something as repulsive as fish paste could add. Served with some lightly steamed green beans, it’s a delicious and surprisingly quick meal. One that I will try again. Anchovy is not, after all, a 4-letter word.

Turkey Cutlets in Anchovy Butter Sauce

Makes 4 servings.
Recipe from Epicurious.

INGREDIENTS
1/3 cup all-purpose flour
1 1/2 pounds turkey cutlets
3 tablespoons olive oil
1 large shallot, finely chopped
1 cup dry white wine
2 teaspoons anchovy paste
3 tablespoons unsalted butter
2 tablespoons chopped chives

DIRECTIONS
Stir together flour and 1/2 teaspoon each of salt and pepper on a plate. Pat cutlets dry, then dredge in flour, shaking off excess.

Heat oil in a large heavy skillet over medium-high heat until it shimmers, then sauté turkey in 2 batches, turning once, until golden and cooked through, 3 to 4 minutes per batch. Transfer to a plate and keep warm, loosely covered with foil.

Brown shallot in fat remaining in skillet, stirring frequently, about 2 minutes. Add wine and boil, stirring and scraping up brown bits, until reduced to about 1/3 cup, about 3 minutes. Remove from heat and whisk in anchovy paste, butter, and chives until incorporated. Return cutlets to skillet with any juices from plate and turn to coat.

Turkey, Turkish, Ottoman “Surprise” Baklava and Spices Gone Wild

Almond and Walnut Baklava

So as I was slaving away during my 3-hour-solo-dinner challenge the other night, I figured, I’ve already got the phyllo dough out and thawed, why not make baklava too?

While it was good in principal, and actually ended up being pretty tasty, it could have been a disaster.

You see, the recipe calls for 1 to 2 teaspoons of ground cinnamon in the filling.

Cinnamon and Definitely NOT Cinnamon

That, my friends, is cayenne pepper. I don’t think I even need to say what happened here. Poor Taylor, still on the floor, heard me start swearing in the kitchen and panicked thinking I cut myself. Nope, but I did just dump in a boatload of cayenne into the freshly ground nut filling.

I hadn’t stirred it yet, luckily, and managed to skim off ‘most’ of the offending spice. Reground some more nuts, and hoped that you wouldn’t be able to taste it in the final product.

You couldn’t. In fact it was a decent baklava. I used the recipe I found here, using maybe 2/3 almonds (some regular and some marcona), and then the rest walnuts, because I ran out of almonds. I think it could have been better… I wasn’t too fond of the walnuts in there. Anyone have a killer baklava recipe that they swear by?

I do have to say, that this experience has reinforced the fact that our spices are out of control. Maybe if the labels hadn’t rubbed of the bottles, the above disaster could have been avoided. But the spice rack is just the beginnging…

Spice Rack
It all started with the spice rack. Until you realize that you cannot be limited by the 16 random spices that someone decided to fill it with (Dill Weed, anyone?).

Spice Drawer
Then things start to migrate into the spice drawer. Good in concept – the drawer is just deep enough to lay down one row of spice bottles. But when that gets full, and you start buying bigger bottles and bags of spices… well..

More spices on the shelf.
That’s when things really start to get messy. They get thrown on a shelf in the cabinet. The very deep shelf that makes them almost impossible to find (”Taylor, where’s the oregano?” I say with my head as deep inside the cabinet as it will go. Maybe I should just get Kitty to get it for me).

They multiply, I tell you! And we’ve just discovered the wonder of spice that is the international food store, which only sells spices in large bags. Too much to transfer to a bottle (not that there’d be room in the drawer anyway), we need some spice mason jars or something. But where on earth would those go?!?

And thus I pose another question – how do you keep your spices under control? We have limited space – that drawer and some counter is about all of the room we have for any spice-containment-unit.

Turkey Ottoman Gyros and Homemade Pita Bread

Turkey Gyros and Homemade Pita Bread

Ok, so just because my last post was so – monumental? – doesn’t mean I’m ignoring you. We’ve still been cooking, and eating, and taking pictures of things… but surprisingly we’ve also been repeating things. Like that Darn Good Pasta Salad? Yea. Made it three times since I posted it. This gem of a red-lentil-soup? A few times more. And well, to be honest, sometimes I just want to sit down and eat something when we finish it, rather than spending time trying to take pretty pictures of a piece of fish that fell apart in the pan. Yes, that happens too.

Anyways, on to the food. Because that’s the reason we’re all here, right?

One good, new thing we made this week (well, mostly new) was this…. a twist on the typical gyros with homemade pita bread. For the gyro meat, we usedAlton Brown’s gyro recipe that we had made before… but seeing as ground lamb is not easy to find (can you tell I just LOVE our grocery store?) we used ground turkey instead. Not too bad – different flavor for sure, but good.

But the best part was the homemade pita bread…. made out of necessity, because when was the last time you actually had a really good pita bread from the grocery store? Thought so. They must have finally realized it too because our grocery store even stopped carrying them – completely. That or they just moved them. Either way, I couldn’t find them, and didn’t really want to eat them if I had, so I decided to make it myself.

Making Pita Bread

I will never buy store brand pita bread again. It wasn’t too hard to make it, and the results were beyond delicious. Plus, you get to watch them do this in the oven:

Pita Bread Baking

So I guess that explains where the pocket comes from… another food mystery has been solved!

Sometimes the pocket worked, sometimes it didn’t. Even the pocket-less pitas were good, so don’t toss them! Some of ours also got a bit too crispy. I pressed as much steam out of them as I could without cracking them – but the recipe isn’t kidding when it says put in a plastic bag right away. The steam builds up inside the bag, and softens the bread into the pita bread you’ll recognize. For the really crispy ones – I first covered the bread with a damp tea towel. That softened it enough to get the pocket flatter, at which point I put it in the bag.

Homemade Pita Bread

Makes about a dozen. Recipe from About.

INGREDIENTS
1 package of yeast, or quick rising yeast
1/2 cup warm water
3 cups all purpose flour
1 1/4 teapsoon salt
1 teaspoon granulated sugar
1 cup lukewarm water

DIRECTIONS
Dissolve yeast in 1/2 cup of warm water. Add sugar and stir until dissolved. Let sit for 10-15 minutes until water is frothy.

Combine flour and salt in large bowl. Make a small depression in the middle of lour and pur yeast water in depression. Slowly add 1 cup of warm water, and stir with wooden spoon or rubber spatula until elastic. Place dough on floured surface and knead for 10-15 minutes. When the dough is no longer stick and is smooth and elastic, it has been successfully kneaded.

Coat large bowl with vegetable oil and place dough in bowl. Turn dough upside down so all of the dough is coated. Allow to sit in a warm place for about 3 hours, or until it has doubled in size.

Once doubled, roll out in a rope, and pinch off 10-12 small pieces. Place balls on floured surface. Let sit covered for 10 minutes. Preheat oven to 500 deg F. and make sure rack is at the very bottom of oven. Be sure to preheat your baking sheet also.

Roll out each ball of dough with a rolling pin into circles. Each should be about 5-6 inches across and 1/4 inch thick.

Bake each circle for 4 minutes until the bread puffs up. Turn over and bake for 2 minutes. Remove each pita with a spatula from the baking sheet and add additional pitas for baking. Take spatula and gently push down puff. Immediately place in storage bags. Pita bread can be stored for up to a week in a pantry or bread box, and up to a month in the freezer. Be sure to use freezer bags when storing in the freezer.

12 Temmuz 2009 Pazar

Turkey Picatta Ottoman Picata

Turkey Picatta and Green Beans

Chicken or turkey… either would work here and be just as good. This is a fun meal to do when you need to let out some frustration, as pounding a piece of meat until it’s flattened is oh-so-fun. :) Just don’t over-do it. You want to be sure your pieces are even all around. So don’t get too angry now.

Serve this with a side of freshly steamed green beans, tossed with some olive oil and salt and pepper (simple – but fresh and delicious), and you have yourself a meal.

Turkey Picatta

Makes 4 servings. Recipe from Alton Brown.

INGREDIENTS
1 whole turkey breast, approximately 1 1/2 to 2 pounds
Kosher salt
Freshly ground black pepper
1/2 cup all-purpose flour
2 tablespoons olive oil
6 tablespoons unsalted butter
2 tablespoons finely chopped shallots
1/2 cup white wine
1/3 cup freshly squeezed lemon juice
2 tablespoons freshly chopped parsley leaves

DIRECTIONS
Preheat oven to 200 degrees F.

Cut the turkey breast crosswise into 1/2-inch pieces. Place pieces of turkey, 1 at a time, between 2 pieces of plastic wrap. Squirt the meat lightly with water and squirt the top of the plastic wrap as well. Pound to no less than 1/8 inch thickness.

Season both sides of meat with salt and pepper and then dredge in flour. Shake off the excess flour. Set aside.

In a large saute pan over medium to medium high heat, heat olive oil and 4 tablespoons butter. Once hot, but not yet smoking, brown turkey scaloppine quickly, about 1 minute on each side, and remove to an ovenproof platter. Place in oven to keep warm.

Reduce the heat to low and add the shallots to the pan. Saute for 1 to 2 minutes or until they begin to turn translucent. Add wine and lemon juice to the pan and simmer until slightly reduced, about 2 minutes. Add remaining 2 tablespoons butter and whisk to combine. Season with salt and pepper, to taste, if necessary. Pour sauce over turkey, sprinkle with parsley, and serve immediately.

Lentil, Turkey, & Apple Wraps, Turk, Turkish, Ottoman, Arab

Lentil Apple and Turkey Wraps

Make the best of the fall apples – stick them in anything and everything. You’d be surprised how well they work with just about everything. Like these crisp and refreshing wraps. They’d be good, but somewhat dull if it weren’t for the bright crunch of the apple. These would make a great lunch (or they DO make a great lunch – we had the leftovers the next day and enjoyed them just as much as we did the night before).

Lentil, Turkey, & Apple Wraps

Makes 4-6 servings. Recipe from Epicurious.

INGREDIENTS
4 cups low-sodium vegetable or chicken stock
1 cup dried brown lentils
1/2 cup dried French green lentils
2 stalks celery, chopped
1 large carrot, peeled and chopped
1 sprig fresh thyme
1 teaspoon kosher salt
1 medium tomato, cored, seeded, and diced
1 small Fuji apple, cored and diced
1 tablespoon freshly squeezed lemon juice
2 teaspoons extra-virgin olive oil
Freshly ground black pepper to taste
6 (12-inch) flour tortillas
3/4 pound turkey breast, thinly sliced
1/2 head Bibb lettuce

DIRECTIONS
Place the stock, lentils, celery, carrot, thyme, and salt in a medium saucepan and bring to a boil. Reduce heat to low and simmer until the lentils are tender, about 30 minutes, depending on the lentils. (If they begin to dry out, add water as needed.) Remove and discard the thyme. Drain and transfer the mixture to a bowl; let cool.

Fold in the tomato, apple, lemon juice, and olive oil. Season with the pepper.

To assemble a wrap, place 1 tortilla on a clean work surface. Spread the lentils in the center, top with the turkey and lettuce, and fold up the bottom, left side, and right side before rolling away from you.

Smoked Paprika Fingerling Potatoes


Smoked Paprika Fingerling Potatoes

New Year’s Eve Eve gave us this delicious and balanced meal, the highlight of which might be Taylor’s smoked paprika fingerling potatoes. We paired them with a pre-marinated pork tenderloin from Trader Joe’s, and some roasted asparagus. Though we found this asparagus overly stringy, which I think was a result of the asparagus rather than us. Oh well.

If you’re serving these potatoes with some form of meat like we did, sear your meat, and then saute the potatoes in the same pan with all the delicious drippings. The leftover pork flavored oil did a lovely job of browning these for us, something we sometimes have a hard time achieving.

Smoked Paprika Fingerling Potatoes

Makes 2 side servings.

INGREDIENTS
12 fingerling potatoes
1/4 cup olive oil
salt and pepper, to taste
1 teaspoon smoked paprika

DIRECTIONS
Place the potatoes in a saucepan and cover with water. Set over high heat and bring to a boil. Cook the potatoes until tender, about 7 to 8 minutes. Remove from the heat and cool under running cold water. Once cool enough to handle, place the potatoes on a cutting board and slice in half lengthwise. Season the potatoes with salt and pepper, to taste. Heat a 12-inch saute pan with the olive oil over medium high heat. Place the potatoes, cut side down, in the pan and cook the potatoes until browned and crispy, about 3 minutes. Turn over and cook for another 3 minutes. Transfer potatoes to a bowl and toss with salt, pepper, and paprika until coated.

Turkey Onion Soup with Thyme and Gruyère Crostini

French Onion Soup with Thyme and Gruyère Crostini

A rare indulgence… Taylor decided he wanted to make French Onion Soup, with all it’s rich cheesy goodness. And yes, that cheesy goodness was indeed delicious.

Topped with crusty bread and broiled until the cheese is melted and bubbly, this soup is perfect when you really just want to sit back and savor something warm and satisfying.

I also have to comment on the adorable serving vessels… perfect mini-replicas of our beloved Le Creuset, and in the exact colors to match our rainbow kitchen appliances. A gift from Auntie Sal… we’ve been waiting for the perfect dish to use these, and I think we’ve found it!

French Onion Soup with Thyme and Gruyère Crostini

INGREDIENTS
1 pound yellow onions, halved and thinly cut lengthwise
3 to 5 sprigs of fresh thyme
1 bay leaf
1/4 teaspoon sea salt
Fresh cracked pepper
1 teaspoon all-purpose flour
1/2 cup dry white wine
2 cups beef stock
1 cup water
1 1/2-inch-thick slice of ciabatta bread cut in half
2 tablespoons unsalted butter
1 1/2 cups grated Swiss Gruyère cheese

DIRECTIONS
In a heavy 5-quart pot melt the butter over low heat. Add the onions, thyme, bay leaf, and salt and pepper to taste and cook until the onions are deep amber and exceedingly soft, stirring occasionally, 25 to 30 minutes. Add the flour and cook for 1 to 2 minutes, then add the wine, increase the heat, and let the wine bubble away for 2 to 3 minutes. Add the beef stock and water, and let the soup simmer for 25 to 30 minutes, allowing the flavors to meld together. Season with salt and pepper to taste.

Preheat the oven to broil. Arrange a rack in the middle of the oven.

Place the ciabatta on the middle rack of the oven and toast until crispy, about 2 to 3 minutes per side.

Remove the bay leaf and thyme sprigs from the soup and discard. Pour the soup into two ovenproof bowls, float the toasted ciabatta on top, and cover it with a thick layer of the Gruyère. Put the soup bowls under the broiler on the middle rack and cook 3 to 5 minutes, or until the cheese is fully melted and golden.

Mongolian Beef

Mongolian Beef

This recipe is supposedly a “copy-cat” recipe of PF Chang’s Mongolian Beef. Neither of us can remember what exactly that tastes like, so I can’t say if it actually is or not, but it was pretty darn delicious. By no means healthy, but delicious nonetheless.

We used about half the oil the recipe calls for to cook the beef, but it was still a bit oily, though I guess that is to be expected with Chinese take out food. Mmm grease. The sauce itself is practically candy, and I’m sure the dish would be just as delicious if the beef were quickly pan-seared instead of submerged in cooking oil (sounds appetizing, doesn’t it?).

We added some yellow onion, which Taylor insists is always in a good plate of Mongolian beef. And he would know. It’s his go-to meal whenever we go out to dinner at a Chinese restaurant. You think he’d be more adventurous, but nope. Mongolian beef it is.

All we were missing were those crispy rice noodles that I love so much (and that are a blast to fry up yourself). Next time, since, you know, we still have two fajita packs left in the freezer.

Mongolian Beef

Makes 2 servings. Recipe adapted from here.

INGREDIENTS
2 teaspoons vegetable oil
1/2 teaspoon ginger, minced
1 tablespoon garlic, chopped
1/2 cup soy sauce
1/2 cup water
3/4 cup dark brown sugar
vegetable oil, for frying (about 1 cup)
1 lb flank steak
1/4 cup cornstarch
1 medium yellow onion, thinly sliced
2 large green onions

DIRECTIONS
Make the sauce by heating 2 teaspoons of vegetable oil in a medium saucepan over med/low heat. Add ginger and garlic to the pan and quickly add the soy sauce and water before the garlic scorches. Dissolve the brown sugar in the sauce, then raise the heat to about medium and boil the sauce for 2-3 minutes or until the sauce thickens. Remove it from the heat.

Slice the flank steak against the grain into 1/4″ thick bite-size slices. Tilt the blade of your knife at about a forty five degree angle to the top of the steak so that you get wider cuts. Dip the steak pieces into the cornstarch to apply a very thin dusting to both sides of each piece of beef. Let the beef sit for about 10 minutes so that the cornstarch sticks.

Heat up one cup of oil in a wok or large skillet until it’s nice and hot, but not smoking. Add the beef to the oil and saute for two minutes, or until the beef just begins to darken on the edges. You don’t need a thorough cooking here since the beef is going to go back on the heat later. Stir the meat around a little so that it cooks evenly. After a couple minutes, use a large slotted spoon to take the meat out and onto paper towels, then pour the oil out of the wok or skillet.

Put the pan back over the heat, dump the meat back into it. Add the onion and saute for one minute. Add the sauce, cook for one minute while stirring, then add all the green onions. Cook for one more minute, then remove the beef and onions with tongs or a slotted spoon to a serving plate, leaving the excess sauce behind in the pan.

Vanilla Almond Cupcakes with Blackberry Buttercream

Vanilla Almond Cupcakes with Blackberry Buttercream

I was feeling fruity the other day. Feeling fruity and vanilla-y and almond-y. Normally I’d either do vanilla cupcakes or almond cupcakes, but not this time. No, I wanted both. And this light and delicate cake provided just that. Flecks of almond meal and vanilla bean, spiked with almond extract, and topped with a bright blackberry buttercream, well, I don’t have to tell you that these were delicious.

A perfect choice for a dinner with friends – perfect because, well, our friend’s daughter joined us for dinner, and her favorite color just happens to be purple. Let’s just say that she wouldn’t give in until she got her purple cupcake BEFORE dinner, where she proceeded to dive in and lick every bit of the purple frosting off of the cupcake before she was satisfied.

And unlike some cupcakes I’ve made, these beauties are naturally purple… or purply-pink, to be precise.

Vanilla Almond Cupcakes with Blackberry Buttercream

They almost became a post for the failed-cupcake-hall-of-fame. See, I first added a bit of tofutti cream cheese to the frosting as I didn’t want it too sweet. I’ve done it before with chocolate buttercream, and the other flavors in the frosting always overpowered any weirdness lingering from the tofutti (I admit, it is not a substitute for the real thing). But in this case, I took a lick and realized something was horribly wrong. Took a finger-full to Taylor too just to confirm my suspicions. He nailed it – the frosting tasted like berry flavored yogurt, a few too many days past it’s sell-by date. Funny how non-dairy cream cheese can give an overpoweringly dairy-like taste to an otherwise good frosting. In to the trash it went.

Take 2: much better. No cream cheese. Fresh blackberries, pureed and strained. Half a vanilla bean, scraped off the pod and beautifully speckling the violet fluff. Just a hint of fragrant almond. And to top it all off – proof that my spiffy new flower molds DO work with marzipan (not quite as well, marzipan is extremely fragile and doesn’t hold the delicate shape as well), but it was the perfect topping on the perfect cupcake.

I don’t think I am the only one to think that the timing of these couldn’t be any better – can you say, perfect mothers’ day treat? I know my mom in particular would swoon over these (or anything almond for that matter – like mother like daughter!). If only I could figure out how to ship cupcakes to her, I would send her a box of these in an instant.

Vanilla Almond Cupcakes with Blackberry Buttercream

Makes 12 cupcakes.

INGREDIENTS
Cupcakes:
1 cup all-purpose flour
1/4 cup almond meal
1 teaspoon baking powder
1/4 teaspoon baking soda
1/2 teaspoon salt
3/4 cup granulated sugar
1/3 cup oil
1 cup coconut milk
1/2 vanilla bean (seeds only)
1/2 teaspoon almond extract

Blackberry Buttercream:
1/2 cup (1 stick) butter or margarine, room temperature
3 cups confectioners’ sugar
3 tablespoons fresh blackberry puree, strained
1/2 vanilla bean (seeds only)
1/4 teaspoon almond extract

DIRECTIONS
Preheat oven to 350 degrees F.

In a large bowl, sift together flour, almond meal, baking powder, baking soda, and salt. Add sugar and mix. Whisk together oil, coconut milk, vanilla bean, and almond extract. Make a well in the center of the dry ingredients and pour in the wet ingredients. Mix until relatively smooth. Fill cupcake liners with a scant 1/4 cup of batter (should be just under 2/3 of the way full). Bake for 20-22 minutes or until golden, and toothpick inserted in the center comes out clean. Transfer to cooling rack and allow to cool completely.

For frosting, cream butter in electric mixer for 1-2 minutes until fluffy. Slowly add 1 cup sugar and beat until smooth. Add blackberry puree and mix until combined. Add remaining confectioners’ sugar, 1/2 cup at a time, and beat until well incorporated. Add vanilla bean and extract and mix at medium-high speed until light and fluffy (2-3 minutes). Pipe or spread onto cooled cupcakes. Top with a marzipan flower, if desired.

Molten chocolate cake

Molten chocolate cake

Everyone knows chocolate is great for improving the mood… So why should you refrain from eating it?! Get ready, this molten chocolate cake recipe is a killer! ;-) The one on the picture could have been baked a little less so the center would have been more liquid… You’ll just have to try and adjust the cooking time to your own tastes. Whenever the borders are done, you can take them out of the oven. The bigger the ‘uncooked’ area in the center, the more liquid your molten chocolate cake will be.

Preparation time: 15 mn (+ 1h in the fridge) Cooking time: 6 to 7 mn

Ingredients (for 4 to 6 cakes)

7 oz (200 g) of dark chocolate (70% cocoa)
1/2 cup (110 g) of butter
1/4 cup (50 g) of golden or brown sugar
3 tablespoons of whipping cream
1 tablespoon of flour
1 tablespoon of corn starch
2 eggs

Instructions

1/ In a salad bowl beat egg and sugar until mixture gets a lighter color. Add flour and corn starch and whisk.

2/ Heat a large saucepan half filled with water.

3/ Dice butter and 5 oz of chocolate and put it, along with the whipping cream, in a smaller saucepan or a metal bowl. Put in (or over, depending the size) the heating water. (This technique is called bain-marie; it’s the best way to melt chocolate without burning it).

4/ Mix molten chocolate in with egg and sugar mixture until it gets smooth.

5/ Leave preparation for 1h in the fridge so mixture gets thicker.

6/ Preheat oven to 410° F (210° C / Th 7).

7/ If you’re going to use a muffin mold, grease it. If you have round pastry cutters, line baking tray with parchment paper and place pastry cutters on it. Cut pieces of parchment paper a little bigger than the height of your pastry cutters, circle them and cover pastry cutters sides with it (as shown on picture).

8/ Fill 2/3 of the pastry cutters with chocolate mixture. Cut the 2 oz of chocolate you have left into small pieces and add on top of the chocolate dough; push it a little with your finger so it gets inside.

9/ Heat in oven for 6 to 7 minutes.

10/ Take chocolate cakes out of the oven and pull carefully parchment paper first and pastry cutters next. (If cooking paper doesn’t come out easily, they’re not cooked enough… Don’t break them! Put them back in the oven a minute more).

11/ Serve right away alone or with vanilla ice cream or custard.